Test Website Deployment for Success
A smoke test can be used to help determine whether a website is up and responsive, it is a quick and dirty test.


I am an IT Pro, I have been for all my career, my specialist subject for a long time has been how to deal with those wee pesky server cage nuts you need to use when you rack physical servers into a data centre. But over the last few years I've had to learn a few new skills and one of those is how to deploy servers using code, something I never thought I'd have to learn
Since starting this blog I've hosted it on a number of different platforms and in a different variety of way. Last year I went full out and my blog is hosted on Azure. It took me a few false starts to get to the place where all this worked, but it does now work. You can read about the deployment and how I've done it in my Azure DevOps for the IT Pro post.
One thing that I've always thought that was missing from my Deployment Pipeline was a test to check that after deployment the website was actually there, there was a response from it and it was working as expected. But I could never figure out how to do it, there wasn't anything obvious that I could find in Azure DevOps either in the Pipeline section or the Test Plan section, however after much trawling through the Internet I discovered what I was looking for and it's called a SMOKE TEST!
Now this is maybe something my developer colleagues get taught as a basic 101 skill but it's a phrase I've never heard of before. The Wiki definition of smoke testing is:
In computer programming and software testing, smoke testing (also confidence testing, sanity testing, build verification test (BVT) and build acceptance test) is preliminary testing to reveal simple failures severe enough to, for example, reject a prospective software release.
Using the Smoke Test
The Smoke Test can help you do a simple, basic check to see what response code your website gives back. I'm not conversant in response codes but I do a few "common" ones:
- 200 - Success/OK
- 404 - Not Found
- 500 - Internal Server Error
I want to set up a smoke test that makes sure my website is giving off a 200 code and not a 404 or something else.
Adding a Smoke Test to my Deployment
I didn't think adding the Smoke Test to my Blog Pipeline deployment would be destructive, however following best practices I set up a test website and pipeline I could tinker with to test how it would work first of all before putting it into my production environment.
Creating a Test Website and Pipeline
My first step was to create an Azure Web App to host my test website in, I ran the following code with the Azure Cloud Shell to do that:
The next thing you need to do is create a new Project within Azure DevOps. A public or private one is fine, whichever one you have access to is fine.
You should be dumped onto the DevOps Project landing page that should look something like this:

The first thing to do is add your code, so click on Repo either down the left hand side or within the center console. Azure DevOps will tell you there is no code and will give you some options to add some. In this example we are going to import code from a GitHub repo that I have created. My GitHub repo has a basic HTML5 test website that I cloned from another user within GitHub. You can use this as a test or you can use your own code.
Now we have to bundle that code into a deployable package that can be used within the Azure Web App we created earlier. We can do this by using the Build functionality under Pipeline. To build your code or deploy your software you need at least one agent. As you grow you might need more agents.
So let's click on Pipeline and then Build. You'll be given the option to create a new Pipeline. Let's do that.
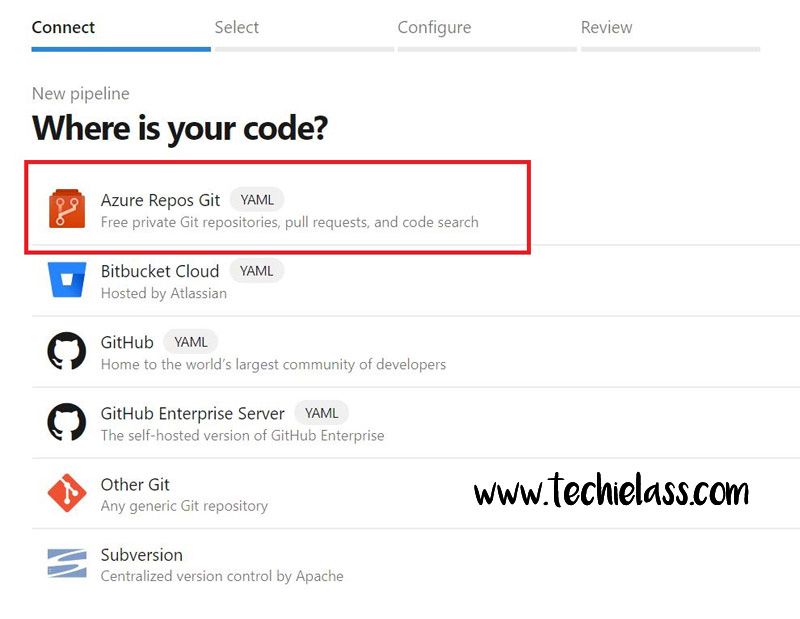
The first screen will ask you where your code is stored, in this case we are using the Azure Repos Git in our project:
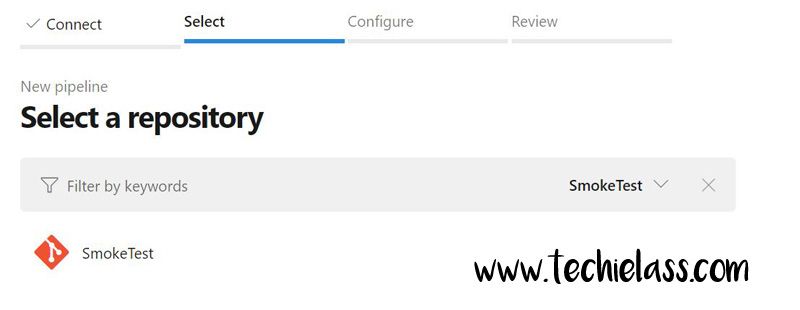
We're then asked which Repo to pick, I only have one:
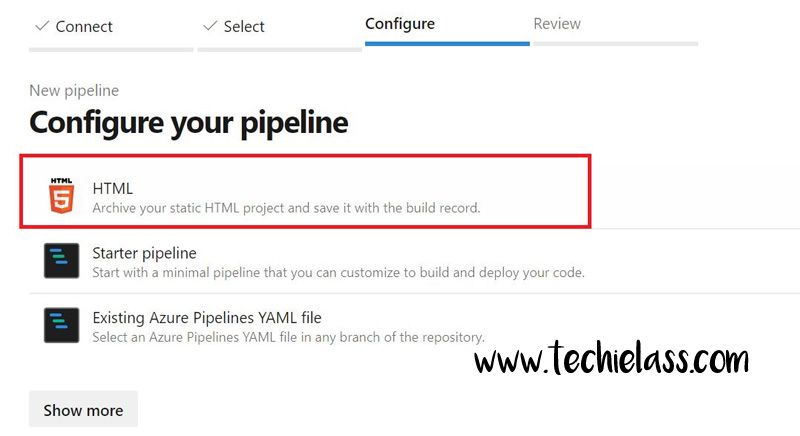
We now want to configure how that Build job completes. You can get complex with this stage but I am only trying to deploy a simple HTML5 website so I select the top option:
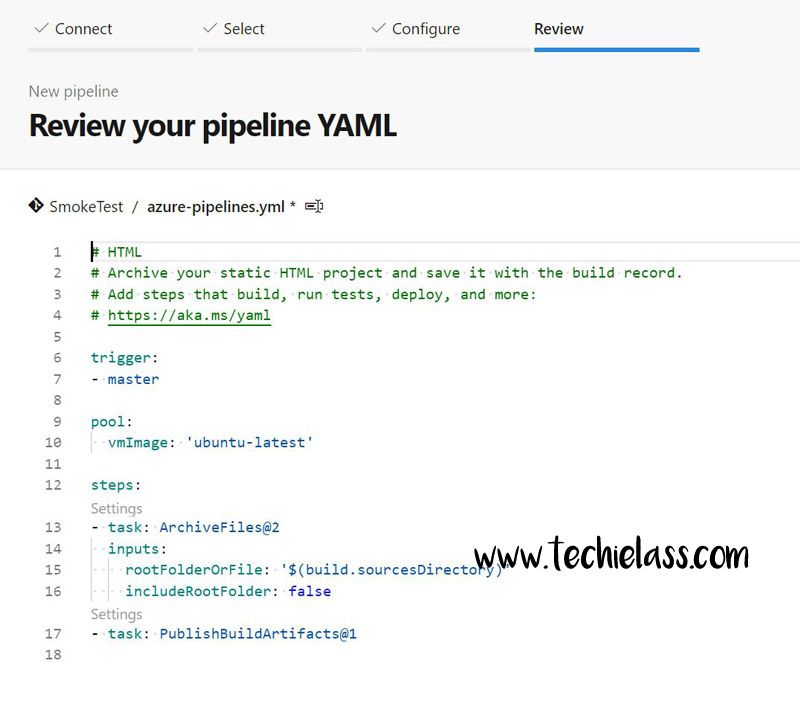
The job will now create and build it for the first time, it should create an artifact which is ultimately your code packaged up in a ZIP file that can be deployed to the Azure Web App.
The next step is to release that code to your Azure Web App and have Azure DevOps do that automatically. So we need to click on Release under Pipelines. Again you'll be given the option to create a new one, let's do that. When it is created your first prompt will be which template you want to use, in this case we're going to use "Azure App Service Deployment".
Next we need to name the stage.
Once it'd been named, we need to start adding in some details to this release pipeline.
Let's start with the artifact. We want to use the build that we created in the previous stage. So click on Artifact and a new wizard will start.
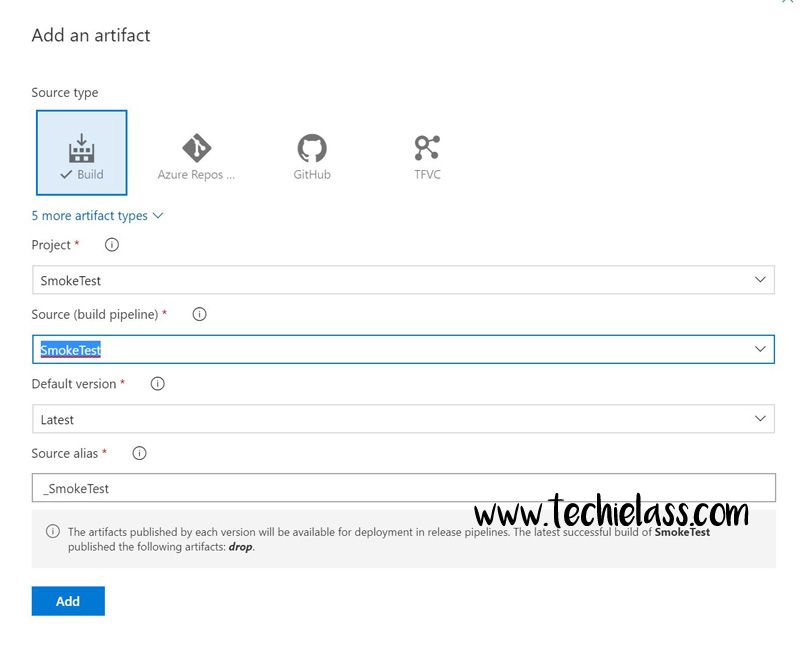
Some information will be pre-populated for you, in the empty drop down box select the name of the build that you created earlier. Once you do this more options will start to appear. For the default version I select "Latest" and then click on Add.
We want this release pipeline to be triggered every time we push code to our repo and a new build is created, so we want to create a continuous deployment trigger. That is the wee lightning bolt icon next to the artifact.
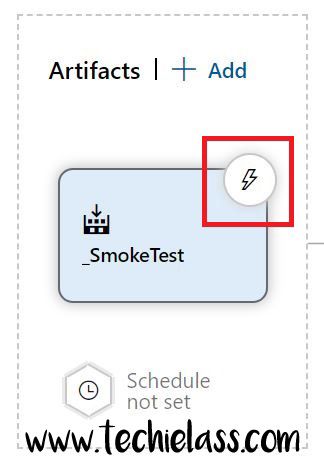
When the Continuous Deployment Trigger wizard opens we want to flick the first switch to Enabled.

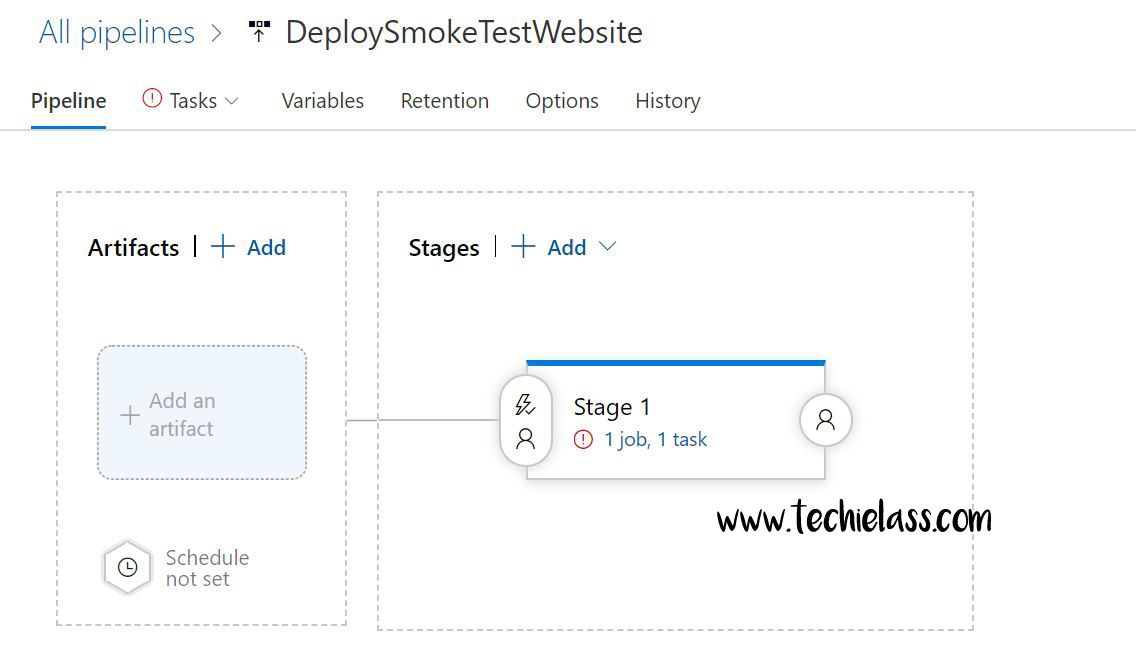
Now let's concentrate on the settings for the Stage part. Click on the section that says "1 job, 1 task".
A new wizard will open, and this is where you need to select the Azure Subscription and Web App you want to the code to deploy to. We are deploying to a Linux Web App in this case, so ensure that is selected. Once you've inputed the right information save this.
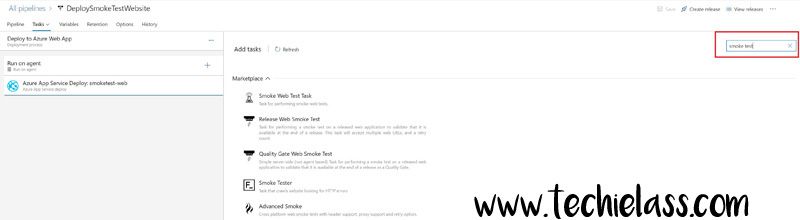
Now we want to add an another task, which will be our smoke test. To do this we click on the plus symbol:
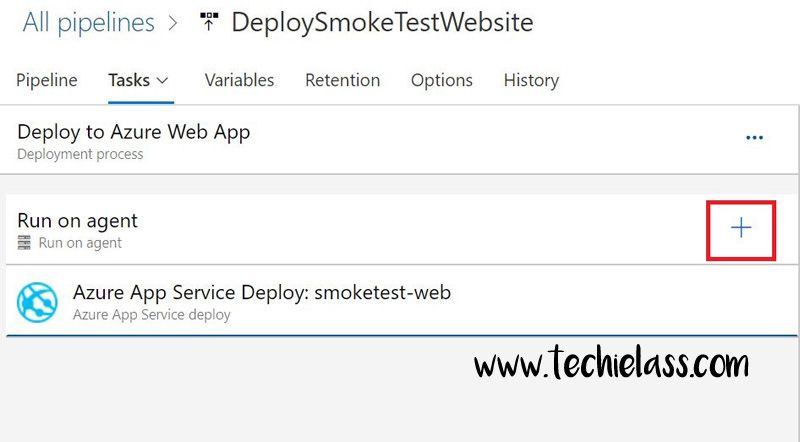
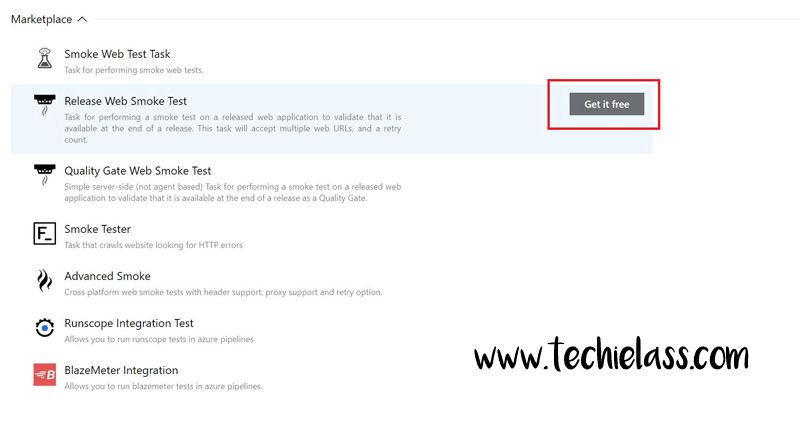
You will be presented with a list of tasks, if you go into the right hand corner you will find a search bar, input smoke test. You'll get a variety of options, these are tasks that other members of the community have created, they haven't been created by Microsoft.

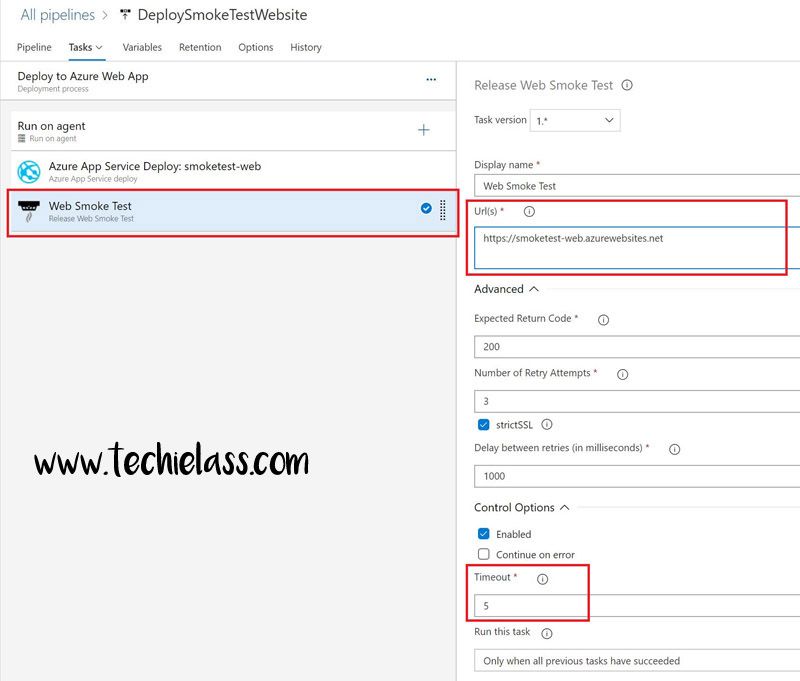
I've chosen to utilise the "Release Web Smoke Test" by Jeff Przylucki. To be able to use this task within my Pipeline I need to click on the Get it free button.
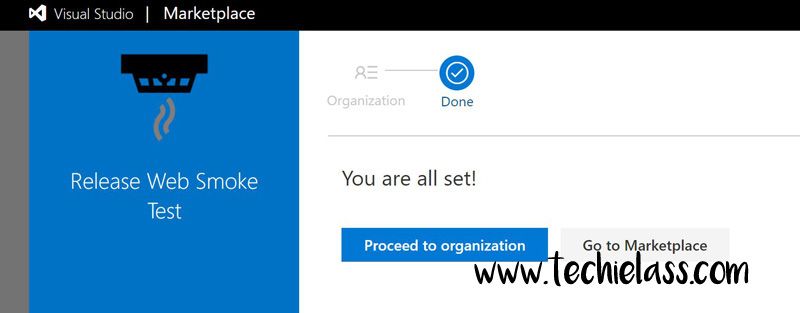
A new website will open and you will be taken to more information about this task and what it can do etc. On this site will be another Get it free button, click on this. You will be asked which organisation you want to import this task into, select your organisation and click on Install. After a few seconds you will be told it's been installed and you are all set.
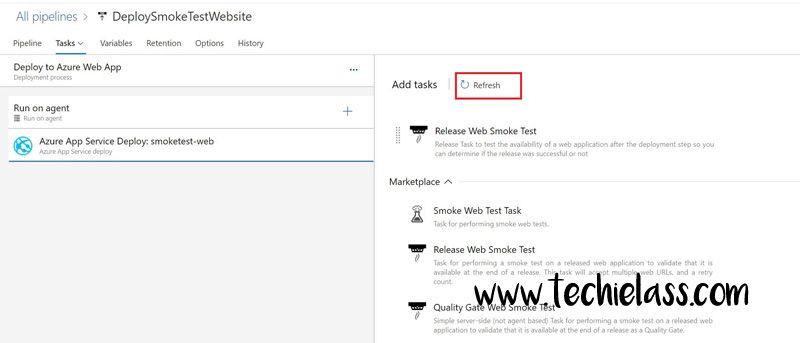
If you switch back to you Azure DevOps pipeline and hit refresh you'll see the task is now available for you to use.
We now hit add and add this as a task to your Pipeline. You need to configure some information, the most important being the URL you want to test. This is the URL of the Web App that we created earlier:
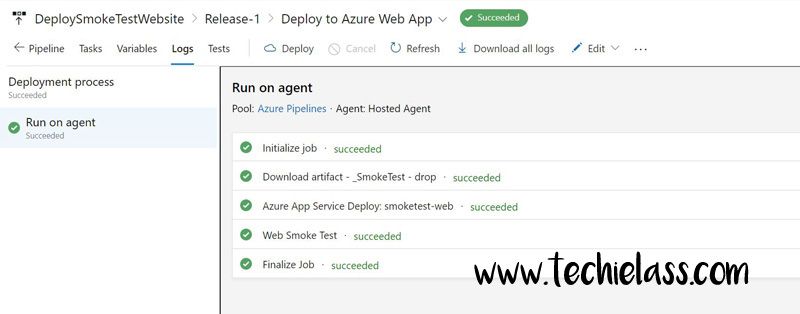
The Pipeline is now ready for use, we trigger it manually and it completes successfully, deploying the code to the website and testing the that the URL gives a response code of 200:
Conclusion
So if you want to be able to deploy a website via Azure DevOps and do a quick sanity check to see if the website is up and running okay, use a Smoke Test.