Using Azure Workload Identity Federation (OIDC) with Azure DevOps to deploy Terraform
Learn to securely deploy Terraform with workload identity federation in Azure DevOps, improving security by eliminating long-lived credentials.

I previously wrote blogs on deploying Terraform via Azure DevOps and GitHub Actions. One piece of feedback I received stood out: we should move away from using Azure service principals for authentication and instead adopt workload identity as the preferred method.
That feedback was spot on.
In this blog, I’ll walk you through how to set up a new Azure DevOps project, create a workload identity, and configure the project to deploy a Terraform configuration file.
Prerequisites
Before proceeding, ensure you have the following:
- Azure Subscription: Required to host resources. If you don’t have one, sign up for a free trial.
- Azure DevOps Account: To create CI/CD pipelines. If you don’t have one, you can sign up here.
What is Workload identity federation and how does it work
Workload identity federation is an Azure feature that leverages OpenID Connect (OIDC) to enable secure, short-lived, credential-free authentication for accessing Azure resources. Instead of relying on traditional methods like secrets or service principles, it allows you to establish a trusting relationship between your Azure environment and external systems, such as Azure DevOps. This trust enables seamless, automated authentication without exposing sensitive credentials.
Why use Workload identity federation
Adopting workload identity federation enhances your security posture by eliminating the need to manage, share, and rotate long-lived secrets or credentials. It addresses the challenges posed by Azure service principals, providing a more secure and scalable way to authenticate and authorise workloads in your Azure environment.
How to run Terraform in an Azure DevOps Pipeline
Create identity
The first thing to do is to create an app registration in Entra ID (formerly Azure AD).
- Go to the Azure Portal.
- Search for Microsoft Entra ID.
- Click on App Registrations down the left-hand side menu.
- Click on New Registration.

- Give it a name and keep the other settings as the default.
Set Azure subscription permissions
The app registration also needs permission to deploy the Azure resource to the wider subscription.
Setting the appropriate permissions is a whole topic in itself, but for this example, we’re going to grant the app registration Contributor permissions on the entire subscription.
- Within the Azure portal browse to Subscriptions then select the subscription you want to deploy the resources to.
- Select Access control (IAM)
- Click on Add and then Add role assignment
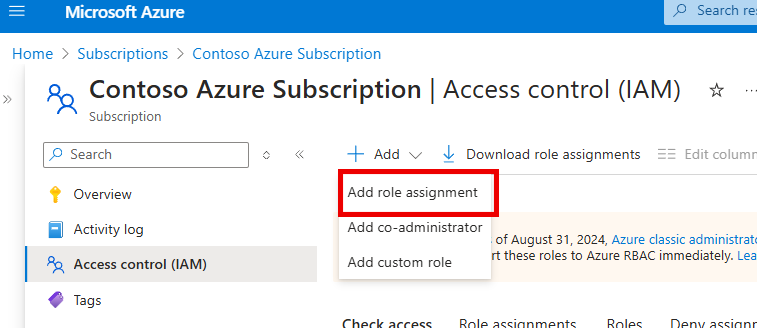
- Select Privileged administrator roles then Contributor
- Select the app registration you created earlier and assign the permissions.
Set up a Azure DevOps Project
With your account set up, you next need to sign into Azure DevOps and create a project where you’ll be setting up your CI/CD pipelines.
- Go to the Azure DevOps website and sign in with your Microsoft account or organizational account.
- Navigate to Organization: If you’re part of multiple organizations, select the organization where you want to create the project from the top right corner of the page.
- Click on the New Project button.
- In the Create a new project form, fill in the Project Name and visibility and optionally, provide a description for your project, then click on the Create button.

- Once the project is created, you’ll be redirected to the project’s dashboard. Depending on your needs, you may want to add team members, and permissions, or integrate other services to this project.
Create service connection
An Azure DevOps service connection in Azure is a secure, managed connection that links Azure DevOps to Azure.
This connection allows DevOps pipelines to securely access and deploy resources, configure infrastructure, or execute commands on these services without requiring manual credential input each time.
Let’s create one we can use in this example.
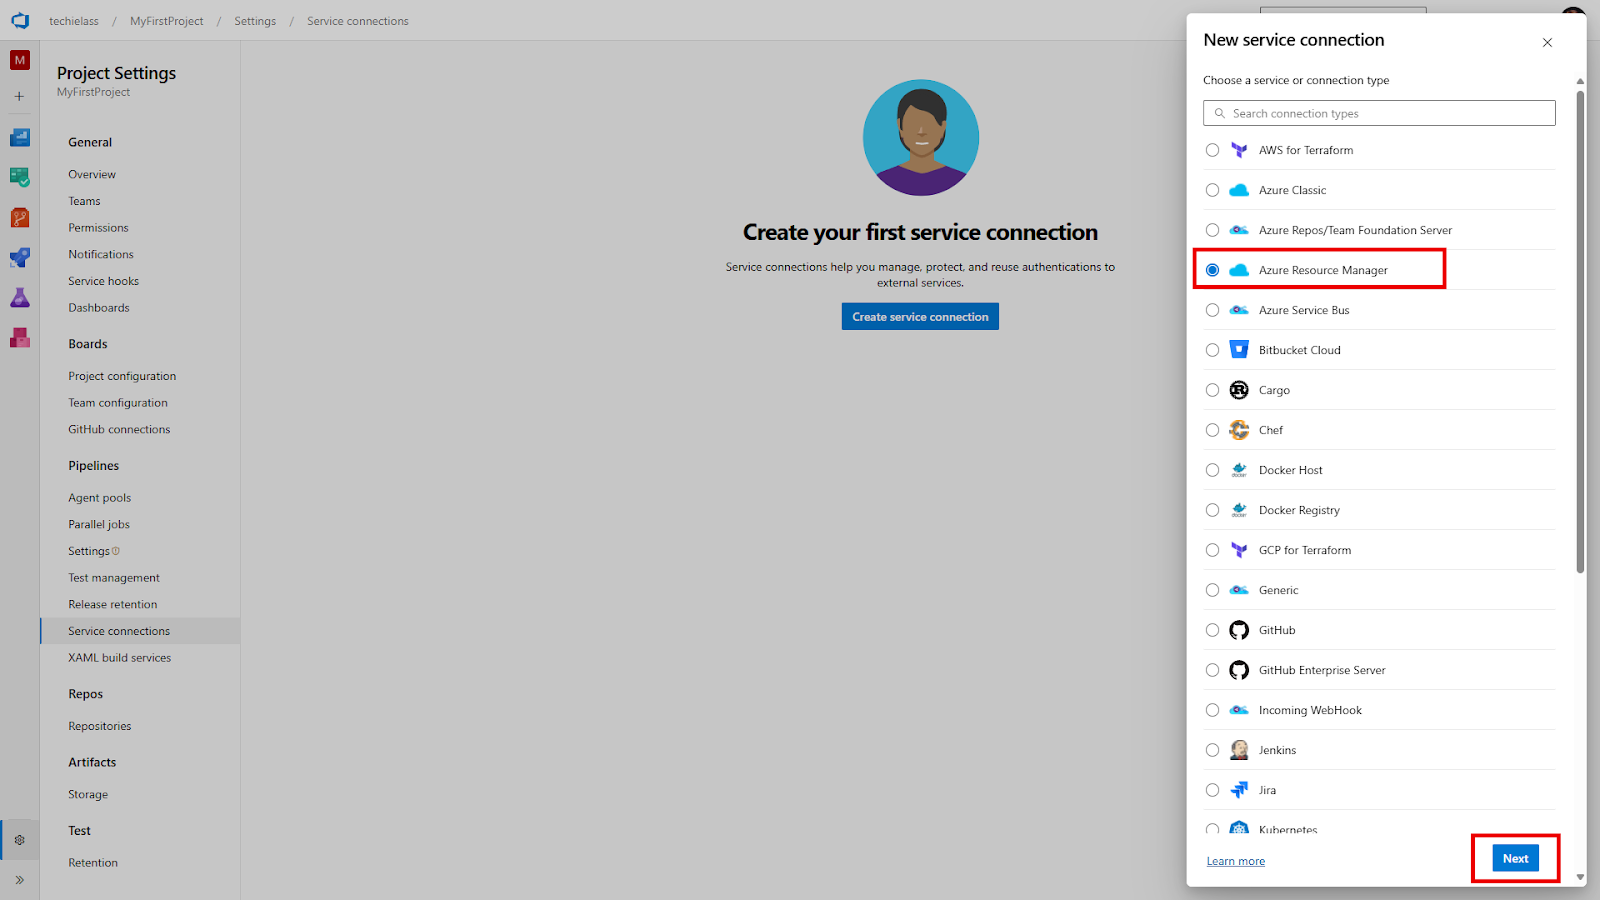
- Click on Projects Settings in the bottom left-hand corner.
- Click on Service Connection, then New Service Connection.
- Select Azure Resource Manager.
- Then select Workload Identity federation (manual).
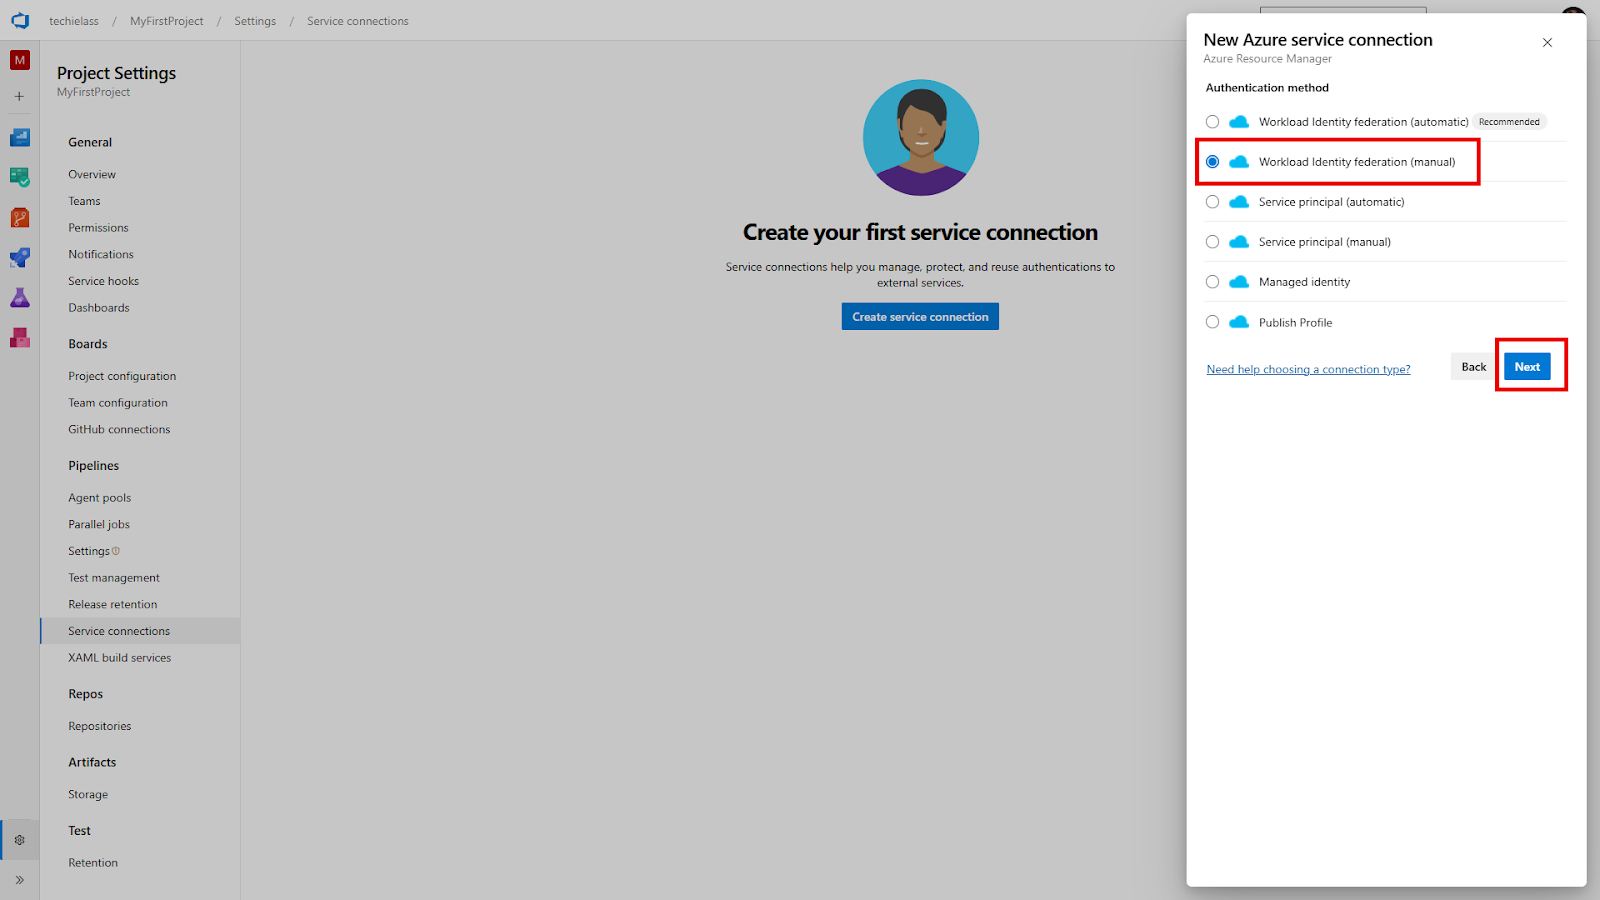
- Give the service connection a name and then select Next.
- Copy the information in the Issuer line and head over to the Azure Portal.
- Search for Microsoft Entra ID.
- Click on App Registrations down the left-hand side menu.
- Find the app registration that you created earlier.
- Click on Certifications & secrets, then select Federated credentials.
- Click on Add credential.
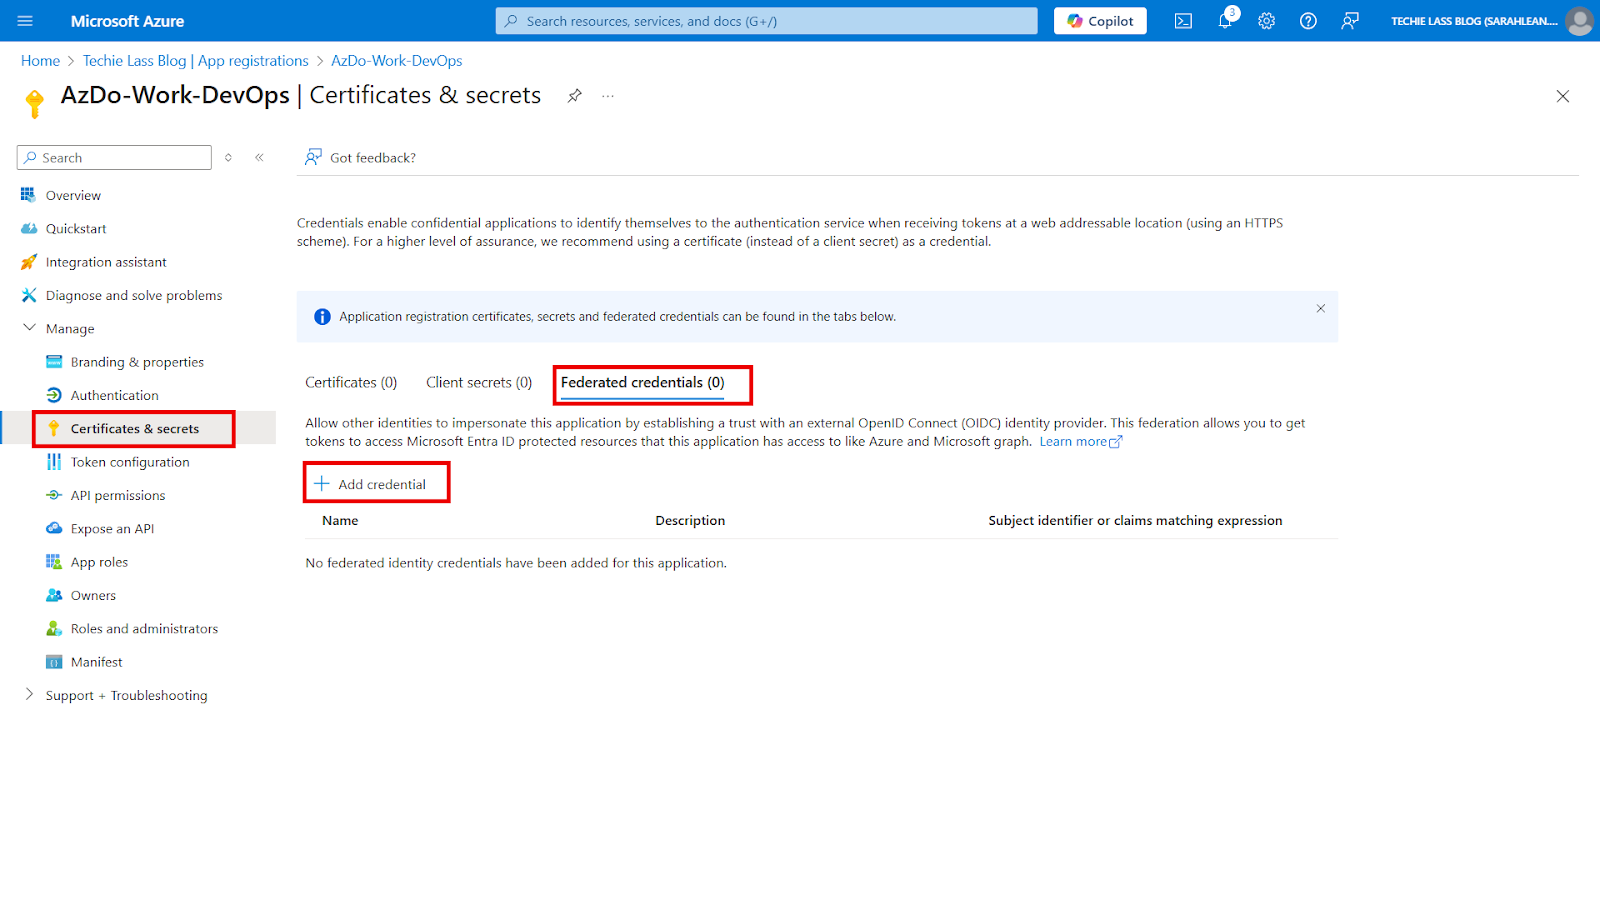
- For the federated credential scenario select Other issuer.

- Paste the value you got from Azure DevOps into the Issuer box.
- Go back to Azure DevOps.
- Copy the value of the Subject identifier.
- Go back to the Azure Portal.
- Paste the value into the Value box.
- Give it a name and click on Add.
- Go back to Azure DevOps.
- Fill in the Subscription Id and Subscription Name boxes with your Azure subscription information.
- Within the Service Principal Id box, paste the Application (client) ID from your app registration.
- And fill in the Tenant ID of your Azure tenant.
- Click on Verify and Save.
Create Terraform configuration files
In order to create the Azure resource we need to create the Terraform file within a repository for storage. You can create the file in a repository within Azure DevOps or somewhere else, like GitHub.
We’re going to use the Azure DevOps repository.
Click on Repos on the left-hand menu and then select Files.
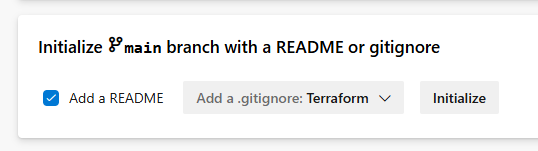
The repository will be empty so we need to initialize it with a readme file and a .gitignore file. Ensure the box is ticked for Add a README and select Terraform within the Add a .gitignore box then click on Initalize.
We can now create a file with our Terraform. To do this, click on the three ellipses button in the left-hand corner near your project name and select New > File.
Give the file an appropriate name like main.tf and click on Create.
Copy the following Terraform making sure to copy in your Azure subscription ID.
terraform {
  required_providers {
    azurerm = {
      source  = "hashicorp/azurerm"
      version = ">=4.14.0"
    }
  }
}
provider "azurerm" {
  features {}
  subscription_id = "XXXX-XXXX-XXX-XXXX"
}
variable "resource_group_name" {
  description = "The name of the Azure resource group"
  type        = string
  default     = "oidcrgexample"
}
variable "location" {
  description = "The Azure location where the resource group will be created"
  type        = string
  default     = "EastUS"
}
resource "azurerm_resource_group" "example" {
  name     = var.resource_group_name
  location = var.location
}
output "resource_group_id" {
  value = azurerm_resource_group.example.id
}
Then click on Commit.
Configure the Azure DevOps Pipeline
We need to set up our pipeline, we’re going to do this by writing the code needed in the YAML file.
Follow these instructions:
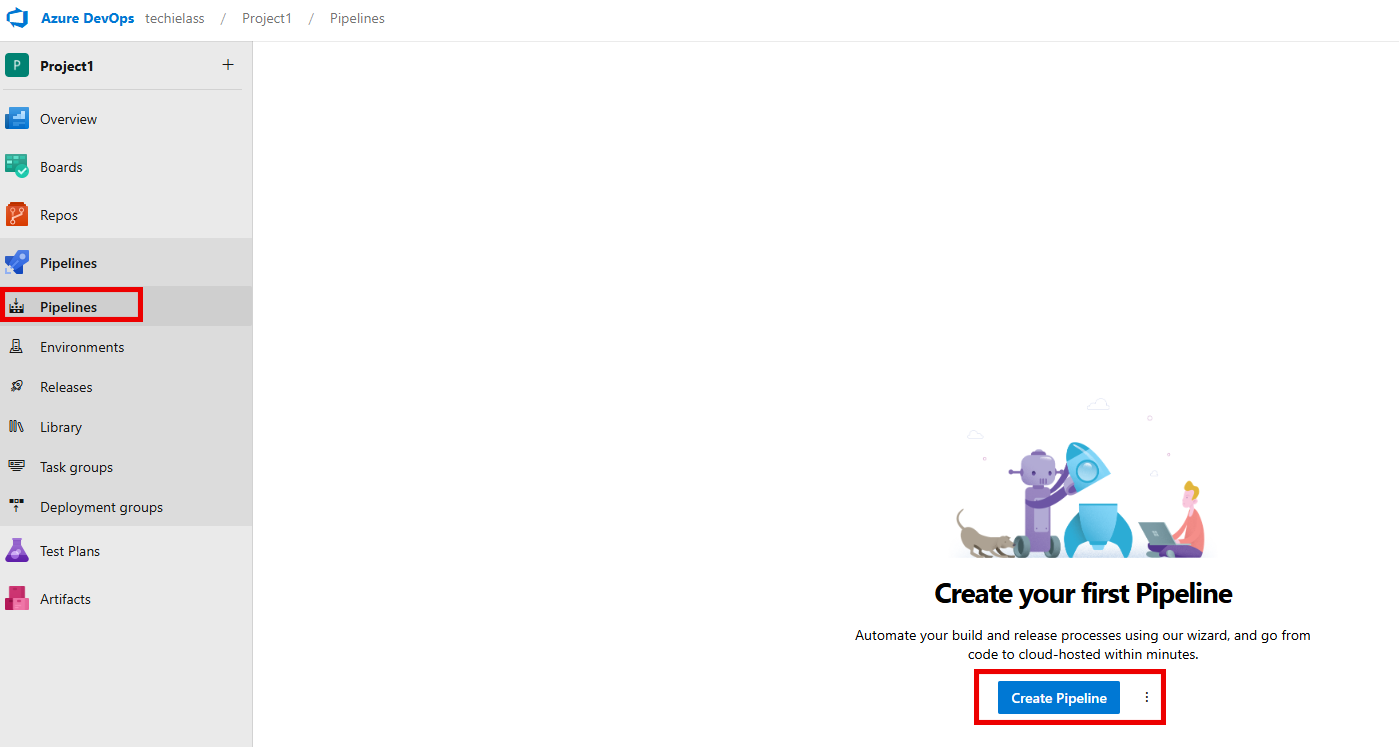
- Click on pipelines in the left-hand side then click on Create pipeline.
- Select Azure Repos Git as the place to store the YAML file.
- Select your project repository.
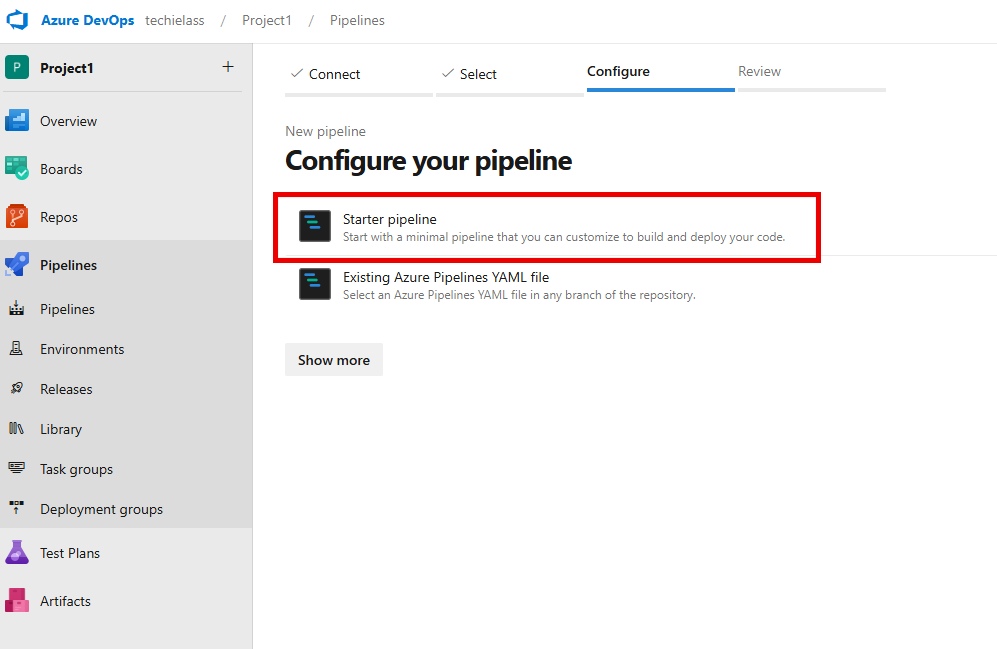
- Then select Starter pipeline.
- Copy the following code into the editor:
trigger:
- main
pool:
  vmImage: ubuntu-latest
steps:
  - task: AzureCLI@2
    name: RunTerraform
    inputs:
      azureSubscription: INSERT NAME OF YOUR SERVICE CONNECTION # The name of your service connection goes here
      scriptType: bash
      scriptLocation: inlineScript
      addSpnToEnvironment: true
      inlineScript: |
        export ARM_TENANT_ID="$tenantId"
        export ARM_CLIENT_ID="$servicePrincipalId"
        export ARM_OIDC_TOKEN="$idToken"
        terraform init
        terraform apply -auto-approve
Once you’ve inputted the code, click the save button to commit the code to your repository.
Run the pipeline
Within the YAML code that we wrote in the stage above is the trigger to run the pipeline whenever code changes within the repository.
To check the pipeline run follow these instructions:
- Click on Pipelines in the left-hand menu then Pipelines.
- If the pipeline is running you can check on its progress, if not you can click on Run pipeline.
Conclusion
By following this guide, you’ve learned how to set up and deploy Terraform using workload identity federation in Azure DevOps. This approach not only enhances security by eliminating the need for long-lived credentials but also simplifies authentication management in your CI/CD pipelines.
Workload identity federation is a step forward in modernising how we authenticate and deploy resources in Azure. As organisations strive for more secure and scalable solutions, adopting features like this becomes essential.
There are lots of other things we could do to improve this setup, those are things for another blog post, but for now, I hope you’ve found this useful or, if you have any questions, feel free to leave a comment or reach out—I’d love to hear your feedback and experiences!